How to Filter an Airtable Interface Using User Groups
When you need multiple departments to share one Airtable interface but each department should only see their own records, the instinct is to build a separate interface for each department.
This works but does not scale. Every time you update the layout, add a field, or change the logic, you repeat the change across every interface. With five departments, that means five times the maintenance for the same interface.
The better approach is one interface that adapts based on who is viewing it, using user groups to control which records each department sees.
What You Need
This feature requires the Business or Enterprise Scale plan. User groups are not available on Free or Team plans.
You also need at least Creator permissions on the base to configure interface filters.
Step 1: Create Your User Groups
User groups are managed at the workspace level.
-
Go to your Airtable home screen
-
Click your profile icon in the upper-right corner
-
Click Manage groups
-
In the panel that opens, click Create group
-
Name the group (for example, "Finance Team" or "Operations")
-
Add members by searching for their names or emails
A few important limitations:
-
Users can only be added to a group if they have a verified Airtable account. External collaborators who have not created an Airtable account cannot be added to groups.
-
Read-only share link users cannot be added to groups.
-
User groups cannot be given Owner permissions in a workspace.
Repeat this for each department or team you want to filter by.
Step 2: Add a Multiple User Field to Your Table
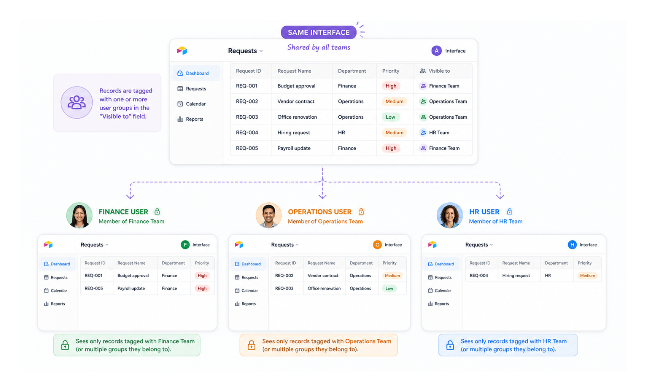
In the table that powers your interface, add a new field of type User. In the field settings, enable Allow multiple users so you can tag more than one user or group per record.
Name the field something clear like "Visible to" or "Department Access."
For each record in the table, tag the group or groups that should be able to see it. A record can be tagged with one group, multiple groups, or left blank if it should be visible to everyone.
Note that user groups cannot be used as the default value for user fields. You will need to tag records manually or via an automation when they are created.
Step 3: Configure the Interface Filter
Now open the interface you want to filter.
-
Click on the canvas area near the title of the interface page. This opens the page-level properties panel, separate from the element-level panel you see when clicking on a specific element like a grid or list.
-
Under the Data section, find the Filter by setting and click the cog icon next to it
-
Click + Add condition
-
In the condition, select your multiple user field (the "Visible to" field you created in Step 2)
-
Set the operator to is or has any of
-
Select Current user
With this filter active, when someone opens the interface, Airtable checks their identity, finds any groups they belong to, and shows only records where those groups have been tagged in the user field.
The result: someone from Finance sees only records tagged with the Finance Team group. Someone from Operations sees only records tagged with Operations. If a person belongs to both groups, they see records from both.
If you prefer to use the built-in "Viewer's records only" shortcut instead of manually setting the condition, you can find this in the Filter by dropdown on the element settings panel (for grids, lists, galleries, and charts). This achieves the same result more quickly.
Step 4: Test Before Publishing
Before sharing the interface, use the Preview as or View as feature in the interface editor to check what each group sees. Select a specific user or group from the dropdown to simulate their view.
This lets you catch any records that are missing a group tag or any records that are showing up for the wrong group before anyone notices.
What to Watch Out For
Records with no group tag are visible to no one (using this filter). If you have existing records that were created before the group tagging system was set up, they will not appear for anyone using the filtered interface. Audit existing records and add group tags where needed, or use an automation to backfill them.
Adding someone to a group does not automatically tag existing records with that group. Group membership controls who can see records that have been tagged with the group, but the tagging itself has to be done explicitly on each record.
External users and portal users cannot be added to user groups, as mentioned above. If your use case involves clients or external stakeholders, you need a different approach, either a separate interface per client using current user filtering by email, or a portal tool like Softr or Noloco that supports row-level access control for external users.
When to Use This vs Separate Interfaces
User group filtering is the right approach when:
-
You have multiple internal teams using the same base
-
The underlying record structure is the same for all groups (same fields, same layout)
-
You want a single source of truth for the interface design
Separate interfaces make more sense when:
-
Different teams need fundamentally different layouts or fields
-
You need different permission levels per team (one team can edit, another can only view)
-
The record structure or workflow differs significantly between groups
For more on how to combine interface filtering with base-level field permissions so different users can edit different fields in the same interface, see Using Base-Level Field Permissions to Control Editing in Interfaces.
For the broader question of what access control is and is not possible in Airtable, see Why You Cannot Restrict Sensitive Data in an Airtable Base.